How to install in multiboot Win XP on a Windows Vista machine (then, installing XP after Vista), hiding partitions and resolving the problem of Windows XP Installed on drive D (tested on an Acer Extensa 5620)
Come installare in multiboot Win XP su una macchina Windows Vista (quindi, installando XP dopo Vista), nascondendo le partizioni e risolvendo il problema di Windows XP installato sul drive D (testato su un Acer Extensa 5620)
0) backup all your valuable data and read all the istructions before starting. if you aren't a braveheart and want something more simple but less useful (i.e. Win XP 'll be installed in the D drive) follow other tutorials as http://www.howtogeek.com/howto/windows-vista/install-windows-xp-on-your-pre-installed-windows-vista-computer/
*) boot Windows Vista
1) Create free space for Windows XP with GParted
1.1) download it from http://gparted.sourceforge.net/download.php
1.2) create a live usb with Tuxboot http://gparted.sourceforge.net/liveusb.php#windows-method-a
1.3) reboot
1.4) run a live usb with GParted
1.5) reduce the space of Vista
1.6) create a partition for XP (10gb are ok)
1.7) format the space for XP as FAT32 (don't worry, the space 'll be reformatted by XP)
*) reboot in Vista
2) remaster a Win XP install disk with nLite adding the required drivers
2.1) download nLite from http://www.nliteos.com/download.html
2.2) download the driver AHCI_Intel_v7.5.0.1017_Vista_XP.zip and Chipset_Intel965_v8.2.0.1012_Vista_XP.zip from ftp://ftp.support.acer-euro.com/notebook/extensa_5620/driver/
2.3) unzip the AHCI driver, and unpack (not install) it with the command line "setup.exe -a -pc:\"
2.4) unzip the Chipset driver, and unpack (not install) it with 7zip
2.5) check what controller you have from System Preferences
2.6) remaster the Win XP cd adding the two drivers, and create with nLive a new cd
3) update with the last BIOS
3.1) download it from http://support.acer-euro.com/drivers/notebook/ex_5620.html
3.2) install running the command "CLB-121.EXE" as administrator
3.3) reboot and check if the hard drive is in AHCI mode (if not, set it)
4) install Plop Boot Manager
4.1) Download Plop from http://download.plop.at/files/bootmngr/plpbt-5.0.13.zip
4.2) install it following the instructions "7. Harddisk install using the Windows boot menu (NT, 2K, XP, VISTA, Win7)" ( http://www.plop.at/en/bootmanager.html#wininst ). Following the instructions, to execute the program "InstallToMBR" as Administrator, open CMD as admin (START > cmd + CTRL + SHIFT + ENTER) and then run the program from the command line.
4.3) reboot
4.4) create in Plop a profile for Windows Vista and XP (hiding Windows XP to Vista and hiding Vista to XP) following the instructions "22. Windows XP and Windows Vista dual boot with hidden (cleared) partitions" ( http://www.plop.at/en/bootmanager.html#ex1 )
4.5) activate in Plop the Win XP profile
4.6) reboot with CTRL + ALT + CANC
5) install Windows XP from cd
6) reboot with Windows Vista CD and restore MBR
6.1) open the command prompt
6.2) launch the command "BOOTREC.EXE /FixMbr"
6.3) launch the command "BOOTREC.EXE /FixBoot"
7) recover hidden Vista partition with TestDisk
7.1) run live Ubuntu ( http://www.ubuntu.com/download/ubuntu/download ) from an usb key
7.2) install the package TestDisk ( http://www.cgsecurity.org/wiki/TestDisk ) : "sudo apt-get install testdisk"
7.3) run TestDisk : "sudo testdisk"
7.4) recover the partition with the sequence : > Create Log > select the disk > partition type INTEL > ANALYSE > QUICK SEARCH > set active partition with LEFT + ENTER to continue > WRITE
*) boot Vista
8) repeat the step 4) from 4.2) to 4.4)
9) End, all right, all installed, no damage (maybe ;-) !!!
Wednesday, September 21, 2011
Monday, July 11, 2011
Novatel MiFi 2352 firmware
Ho scoperto questo fantastico prodotto, acquistato in offerta dalla Vodafone a 29 euro compresi 3 mesi di internet...
per acquistare direttamente l'articolo sbrandizzato buttate un occhio sul sito Multiplex Systems ( http://store.mpxsys.com/ ), che fornisce anche firmware aggiornati ovviamente no brand !!! ( http://store.mpxsys.com/novatel-wireless-hspa-mifi-faq ).
aggiornare il firmare permette di superare il limite di 3 connessioni simultanee imposto dalla Vodafone, di settare in maniera stabile la connessione in 3G o GPRS, e altro ancora.
se volete cercare il firmware in giro su internet, fate attenzione a non scaricare fake o versioni contraffatte, manomesse con virus o altro malware.
per vostra info, un firmware valido è quello che si chiama 20418764_MUU_MiFi23x2_FW5.26.2_ML3.00.57_NvtlGeneric_v1.2_pkg.exe e che ha per hash md5 7EFA29BA99F81EC46CA260875E43D9A2 e sha256 D2F66D39A4595E403AB6C146D311774CC4D398A4314670AD32D28293D635550E .
buona navigazione !!!
Tuesday, April 19, 2011
Sunday, April 17, 2011
Appunti crittografati (aka file di testo crittografati, note sicure, notepad - editor di testo crittografato)
Con l'ultima versione dell'editor libero VIM (per Linux, Windows, OsX), la 7.3, è possibile con facilità e senza bisogno di altri programmi, avere le proprie note crittografate con il potente algoritmo Blowfish (http://it.wikipedia.org/wiki/Blowfish).
VIM è un programma che funziona da DOS o con una interfaccia grafica. I tasti e le sue logiche di funzionamento sono un po' diverse dal normale (come, ad esempio, succede per Emacs), ma per un power user che vuole crittografare le proprie note questo non è certo un problema...
Dopo aver scaricato e installato VIM (vedi links sotto), per avere la propria nota crittografata con Blowfish e non con la crittografia standard di VIM (più fragile, ma di contro più facile da recuperare se si perde la password), la sequenza di comandi è la seguente:
0) lanciare VIM (programma gvim.exe)
1) digitare ":setlocal cm=blowfish" per impostare la crittografia più sicura
2) digitare ":X" e impostare la password utilizzata per i prossimi salvataggi sicuri digitandola due volte
3) digitare "i" per iniziare l'inserimento del testo siuro
4) premere il tasto ESC per uscire dalla modalità inserimento
5) digitare ":w NomeDelVostroFile.txt"
6) digitare ":q" per uscire da VIM
--- per riaprire il file crittografato
0) lanciare VIM (programma gvim.exe)
1) digitare ":o NomeDelVostroFile.txt" per aprire il file
2) inserire la password per il file
3) a questo punto editate liberamente il file, aiutandovi anche con le guide rapide (cheatsheets) per VIM indicate sotto nei links
PS
il file di testo protetto creato con VIM, se aperto con altri programmi, si mostrerà con un file tipo il seguente, nel quale il testo crittografato non si vede, ma si comprende che si tratta di un file crittografato da VIM, perché i primi caratteri sono "VimCrypt" e di seguito c'è l'indicazione dell'algoritmo di protezione utilizzato, nel nostro caso "~02", che è quello più sicuro, a differenza di quello standard meno sicuro che è indicato con "~01".
VimCrypt~02! ÒÜÓ"üø´Òá…ÇâA x«åôæ|º,¾äï´§ Ù
Links
* homepage VIM http://www.vim.org/
* download versione per Windows http://www.vim.org/download.php#pc . scaricare la versione che si installa automaticamente "Self-installing executable", o la versione portable composta di due files "GUI executable" + "Runtime files" da decomprimere nella stessa directory
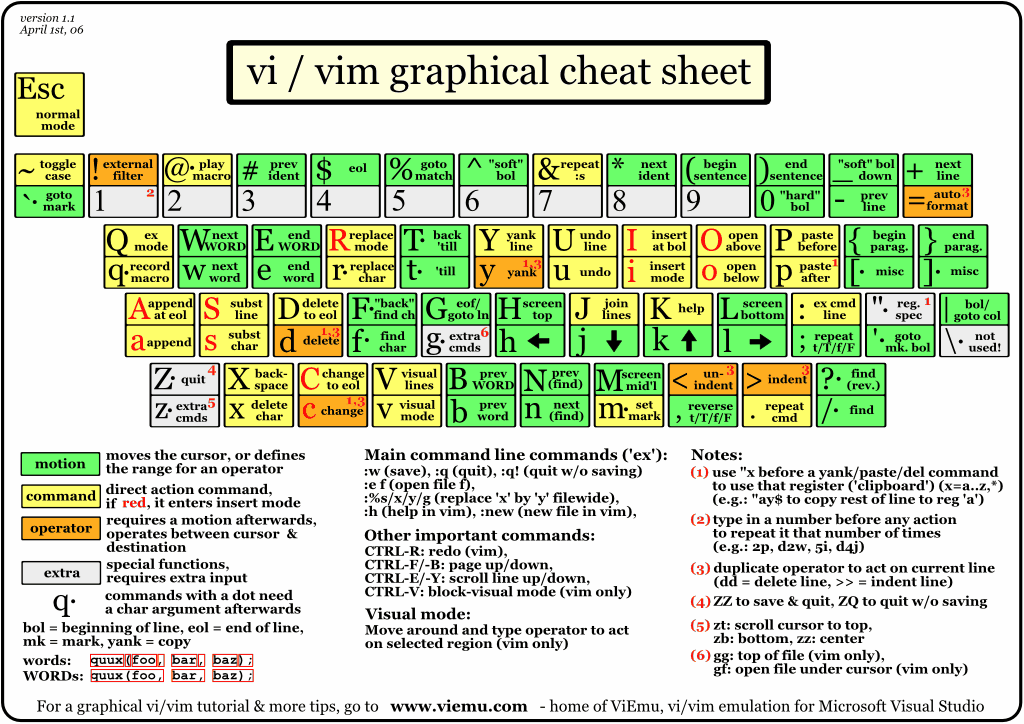
* alcune cheatsheet (guide rapide ai tasti di VIM) http://www.viemu.com/vi-vim-cheat-sheet.gif http://www.gentoo.org/images/vicheat-final.png
VIM è un programma che funziona da DOS o con una interfaccia grafica. I tasti e le sue logiche di funzionamento sono un po' diverse dal normale (come, ad esempio, succede per Emacs), ma per un power user che vuole crittografare le proprie note questo non è certo un problema...
Dopo aver scaricato e installato VIM (vedi links sotto), per avere la propria nota crittografata con Blowfish e non con la crittografia standard di VIM (più fragile, ma di contro più facile da recuperare se si perde la password), la sequenza di comandi è la seguente:
0) lanciare VIM (programma gvim.exe)
1) digitare ":setlocal cm=blowfish" per impostare la crittografia più sicura
2) digitare ":X" e impostare la password utilizzata per i prossimi salvataggi sicuri digitandola due volte
3) digitare "i" per iniziare l'inserimento del testo siuro
4) premere il tasto ESC per uscire dalla modalità inserimento
5) digitare ":w NomeDelVostroFile.txt"
6) digitare ":q" per uscire da VIM
--- per riaprire il file crittografato
0) lanciare VIM (programma gvim.exe)
1) digitare ":o NomeDelVostroFile.txt" per aprire il file
2) inserire la password per il file
3) a questo punto editate liberamente il file, aiutandovi anche con le guide rapide (cheatsheets) per VIM indicate sotto nei links
PS
il file di testo protetto creato con VIM, se aperto con altri programmi, si mostrerà con un file tipo il seguente, nel quale il testo crittografato non si vede, ma si comprende che si tratta di un file crittografato da VIM, perché i primi caratteri sono "VimCrypt" e di seguito c'è l'indicazione dell'algoritmo di protezione utilizzato, nel nostro caso "~02", che è quello più sicuro, a differenza di quello standard meno sicuro che è indicato con "~01".
VimCrypt~02! ÒÜÓ"üø´Òá…ÇâA x«åôæ|º,¾äï´§ Ù
Links
* homepage VIM http://www.vim.org/
* download versione per Windows http://www.vim.org/download.php#pc . scaricare la versione che si installa automaticamente "Self-installing executable", o la versione portable composta di due files "GUI executable" + "Runtime files" da decomprimere nella stessa directory
* alcune cheatsheet (guide rapide ai tasti di VIM) http://www.viemu.com/vi-vim-cheat-sheet.gif http://www.gentoo.org/images/vicheat-final.png
Subscribe to:
Posts (Atom)

